Starting something new can feel intimidating, especially when it comes to fitness. But here’s the beautiful thing about yoga for beginners: it meets you exactly where you are. You don’t need to be flexible, strong or even remotely athletic to start your yoga journey.
Whether you’re looking to ease back pain, reduce stress, improve your flexibility or simply try something new, yoga offers something for everyone. The best part? You can start right at home with nothing more than a comfortable space and an open mind.
In this guide, we’ll walk through everything you need to know about yoga for beginners, including the wonderful benefits you can expect and simple poses to get you started on your journey.
Getting Started: What You Need to Know
Before we dive into the poses, let’s cover some basics that will help you feel confident as you begin.
What You’ll Need
- Yoga mat (or a non-slip towel on carpet)
- Comfortable clothing that allows you to move freely
- A quiet space where you won’t be disturbed
- Optional: blocks, cushions or folded blankets for support
Important Tips for Beginners
- Listen to your body: Discomfort is okay; pain is not
- Breathe naturally: Never hold your breath during poses
- Move slowly: This isn’t a race – take your time
- Use modifications: There’s no shame in making poses easier
- Be patient: Flexibility and strength develop over time
- Stay consistent: Regular short sessions beat occasional long ones
When to Practice
The best time for yoga is whenever you can fit it in! Morning practice energises you for the day ahead, whilst evening sessions help you unwind. Many beginners find that practising before breakfast or before bed works well. Learn more about creating a home yoga routine.
Essential Yoga Poses for Beginners
Let’s start with foundational poses that will form the backbone of your practice. These are gentle, accessible and incredibly effective for building strength, flexibility and body awareness.
1. Mountain Pose (Tadasana)
Why it matters: This might look like “just standing”, but it teaches you proper alignment and body awareness that carries into every other pose.
How to do it:
- Stand tall with your feet together or hip-width apart (whatever feels stable).
- Gently spread your toes and press all four corners of your feet into the ground.
- Engage your thigh muscles slightly, keeping your knees soft (not locked).
- Lengthen your spine, imagining a string pulling the crown of your head upward.
- Let your arms hang naturally by your sides, palms facing forward.
- Relax your shoulders away from your ears.
- Breathe deeply and steadily, holding for 30 seconds to 1 minute.
Beginner tip: Close your eyes to challenge your balance and increase body awareness.
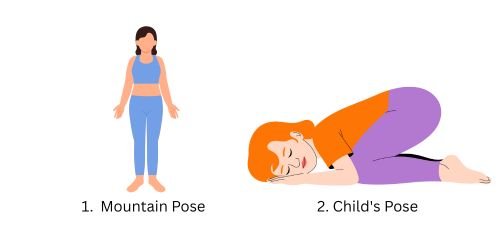
2. Child’s Pose (Balasana)
Why it matters: This is your “rest pose” – return to it whenever you need a break during practice. It’s deeply calming and gently stretches your back.
How to do it:
- Kneel on your mat with your knees hip-width apart or wider
- Sit back on your heels, keeping your bottom touching your feet
- Fold forward slowly, letting your forehead rest on the mat
- Extend your arms forward, palms down or rest them alongside your body
- Relax your shoulders completely and breathe into your back
- Stay here for 1 to 3 minutes or as long as feels comfortable
Beginner tip: If your bottom doesn’t reach your heels comfortably, place a cushion or folded blanket between them for support.
3. Cat-Cow Pose (Marjaryasana-Bitilasana)
Why it matters: This flowing sequence warms up your spine, releases tension in your back and teaches you to coordinate movement with breath.
How to do it:
- Start on your hands and knees (tabletop position)
- Align wrists under shoulders, knees under hips
- Cow Pose: Inhale as you drop your belly, lift your chest and chin and gaze slightly upward
- Cat Pose: Exhale as you round your spine, tuck your chin to chest and draw your belly button toward your spine
- Flow between these two positions for 8-10 slow breaths
- Move with your breath – inhale for Cow, exhale for Cat
Beginner tip: If your wrists feel uncomfortable, try placing your forearms on the mat instead or use a folded towel under your palms.
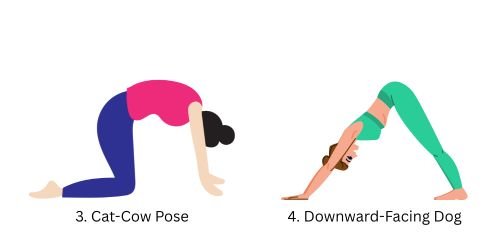
4. Downward-Facing Dog (Adho Mukha Svanasana)
Why it matters: Often called the “ultimate all-over rejuvenator”, this pose stretches and strengthens almost every part of your body.
How to do it:
- Start on your hands and knees, hands slightly forward of shoulders
- Spread your fingers wide, pressing firmly through your palms
- Tuck your toes under and lift your hips up and back
- Create an inverted V-shape with your body
- Keep a slight bend in your knees if your hamstrings are tight
- Let your head hang naturally between your upper arms
- Press your chest gently toward your thighs
- Hold for 30 seconds to 1 minute, breathing steadily
Beginner tip: Don’t worry about getting your heels to the floor – bent knees and raised heels are perfectly fine when you’re starting out. Learn more about common yoga mistakes and how to correct them.
5. Cobra Pose (Bhujangasana)
Why it matters: This gentle backbend strengthens your spine, opens your chest and can help relieve back pain.
How to do it:
- Lie on your stomach, legs extended behind you
- Place your hands flat on the mat under your shoulders
- Press your hips and thighs into the floor
- Inhale as you gently lift your chest off the ground
- Keep your elbows slightly bent, shoulders away from your ears
- Lengthen through the crown of your head, keeping your neck long
- Hold for 15-30 seconds, then lower down slowly on an exhale
Beginner tip: Start with a very low lift – you should feel work in your back muscles, not strain in your lower back.
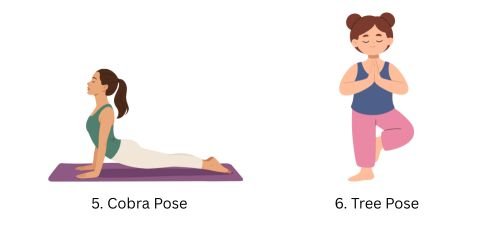
6. Tree Pose (Vrikshasana)
Why it matters: This classic balance pose improves focus, strengthens your legs and teaches you to find stillness and steadiness.
How to do it:
- Stand in Mountain Pose
- Shift your weight onto your right foot
- Bend your left knee and place your left foot on your inner right calf or inner thigh (never on the knee joint)
- Find your balance before moving your arms
- Bring your palms together at your chest or extend your arms overhead
- Fix your gaze on a point in front of you to help with balance
- Hold for 20-30 seconds, then switch sides
Beginner tip: It’s completely normal to wobble – that’s your body finding balance! If you’re struggling, keep your toes on the floor and just lift your heel or practise near a wall for support.
7. Seated Forward Bend (Paschimottanasana)
Why it matters: This calming pose stretches your entire back body and can help soothe anxiety and stress.
How to do it:
- Sit on the floor with your legs extended straight in front of you
- Flex your feet, pressing through your heels
- Sit up tall, lengthening your spine
- Inhale and reach your arms up overhead
- Exhale as you hinge forward from your hips (not your waist)
- Reach toward your feet, shins or knees – wherever you can comfortably reach
- Keep your back as straight as possible rather than rounding to go deeper
- Hold for 30 seconds to 1 minute
Beginner tip: Bend your knees as much as you need to keep your back straight. A straight back with bent knees is better than a rounded back with straight legs.
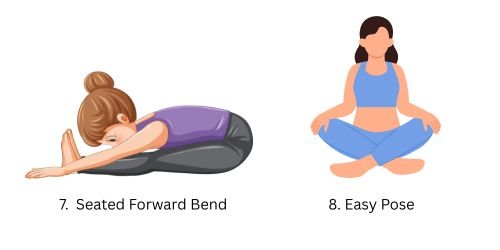
8. Easy Pose (Sukhasana)
Why it matters: This is your go-to seated meditation posture. It’s simple yet teaches proper sitting alignment and breath awareness.
How to do it:
- Sit cross-legged on your mat with your hips on the floor (or on a cushion)
- Let each foot rest under the opposite knee
- Lengthen your spine, sitting up tall
- Rest your hands on your knees, palms up or down
- Relax your shoulders and close your eyes if comfortable
- Focus on your breath, breathing deeply and naturally
- Stay for 1-5 minutes
Beginner tip: If your hips are tight, sit on a folded blanket or cushion so your hips are higher than your knees. This makes the pose much more comfortable.
Intermediate Poses to Progress Your Practice
Once you’re comfortable with the basics, these poses will help you build more strength, flexibility and confidence. Don’t rush to get here – take your time mastering the fundamentals first.
9. Warrior I (Virabhadrasana I)
Why it matters: This powerful standing pose builds leg strength, opens your chest and cultivates inner strength and determination.
How to do it:
- From Mountain Pose, step your left foot back about 1 metre
- Angle your back foot slightly outward (about 45 degrees)
- Bend your right knee over your right ankle
- Square your hips forward
- Raise your arms overhead, palms facing each other
- Keep your shoulders relaxed and gaze forward or up
- Hold for 20-30 seconds, then switch sides
Beginner tip: Keep your front knee aligned over your ankle – don’t let it collapse inward.
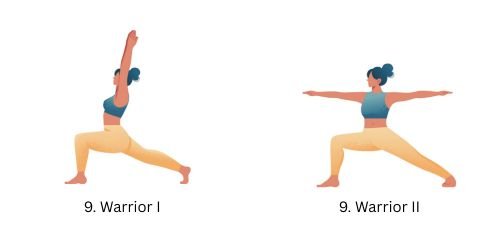
10. Warrior II (Virabhadrasana II)
Why it matters: This pose strengthens your legs, opens your hips and builds stamina whilst improving focus and concentration.
How to do it:
- Start in Warrior I
- Open your hips and chest to face the side of your mat
- Extend your arms out to the sides at shoulder height
- Keep your front knee bent, tracking over your second toe
- Turn your head to gaze over your front hand
- Keep your shoulders relaxed and spine tall
- Hold for 20-30 seconds, then switch sides
Beginner tip: Imagine you’re being pulled in opposite directions – reach strongly through both arms whilst keeping your core engaged.
11. Bridge Pose (Setu Bandhasana)
Why it matters: This gentle backbend strengthens your back, glutes and hamstrings whilst opening your chest and improving spinal flexibility.
How to do it:
- Lie on your back with knees bent, feet hip-width apart and flat on the floor
- Place your arms alongside your body, palms down
- Press your feet and arms into the floor as you lift your hips toward the ceiling
- Keep your thighs parallel – don’t let your knees splay out
- Optional: clasp your hands together under your back
- Hold for 30 seconds to 1 minute, breathing steadily
- Lower down slowly, one vertebra at a time
Beginner tip: If this feels too intense, place a yoga block under your sacrum for support.
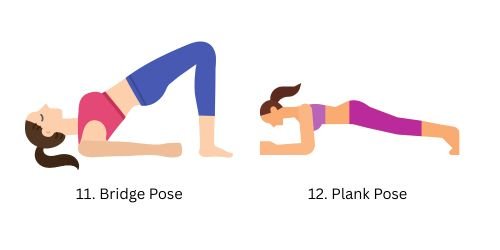
12. Plank Pose (Phalakasana)
Why it matters: Plank is one of the best full-body strengtheners, building core stability and upper body strength.
How to do it:
- Start on your hands and knees
- Step both feet back, coming into a straight line from head to heels
- Keep your wrists under your shoulders
- Engage your core, drawing your belly button toward your spine
- Keep your body straight – don’t let your hips sag or pike up
- Gaze slightly forward, keeping your neck neutral
- Hold for 20-30 seconds (or as long as you can maintain good form)
Beginner tip: Drop to your knees to modify – this still builds strength without compromising your form. Learn about building core strength through yoga.
13. Standing Forward Bend (Uttanasana)
Why it matters: This calming inversion stretches your hamstrings and back whilst promoting blood flow to your brain.
How to do it:
- Stand in Mountain Pose
- Inhale and lengthen your spine
- Exhale as you hinge forward from your hips
- Let your head hang heavy, releasing tension in your neck
- Bend your knees generously if your hamstrings are tight
- You can hold opposite elbows or let your hands rest on the floor
- Hold for 30 seconds to 1 minute
Beginner tip: Always keep a generous bend in your knees to protect your lower back.
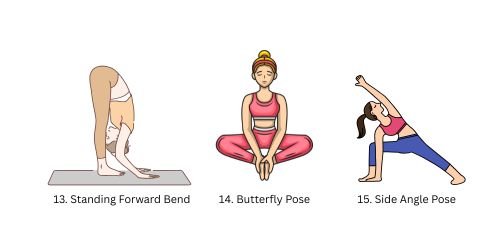
14. Butterfly Pose (Baddha Konasana)
Why it matters: This hip-opening pose is excellent for improving flexibility in your inner thighs and groin.
How to do it:
- Sit on the floor and bring the soles of your feet together
- Let your knees fall open to the sides
- Hold your feet with your hands
- Sit up tall, lengthening through your spine
- Gently press your knees toward the floor (without forcing)
- You can stay upright or fold forward for a deeper stretch
- Hold for 30 seconds to 1 minute
Beginner tip: Sit on a cushion if your hips are tight and don’t worry if your knees are high off the ground – flexibility comes with time.
15. Side Angle Pose (Utthita Parsvakonasana)
Why it matters: This powerful pose stretches your side body, strengthens your legs and improves overall stability.
How to do it:
- Start in Warrior II
- Bring your front forearm to rest on your front thigh
- Alternatively, place your hand on the floor inside your front foot (more advanced)
- Extend your opposite arm up and over your head, creating a long line from foot to fingertips
- Keep your chest open, rotating slightly upward
- Gaze up toward your raised hand if comfortable
- Hold for 20-30 seconds, then switch sides
Beginner tip: Use a yoga block under your lower hand if you can’t comfortably reach the floor.
Common Questions Beginners Ask
How often should I practise yoga as a beginner?
Start with 2-3 times per week, even if it’s just 10-15 minutes. Consistency matters more than duration. As you get comfortable, you can increase frequency.
Do I need to be flexible to start yoga?
Absolutely not! Flexibility is a result of yoga, not a requirement. Everyone starts somewhere and modifications make every pose accessible.
What if I can’t do a pose?
That’s completely normal. Use modifications, take breaks and remember that every body is different. Never force yourself into pain.
Should I practise on an empty stomach?
Ideally, wait 2-3 hours after a large meal or 30 minutes after a light snack. This prevents discomfort in poses that compress your belly.
Is online yoga as good as studio classes?
Both have benefits! Studios offer in-person guidance, whilst home practice offers convenience and privacy. Many beginners start at home and later try a studio.
What should I do if something hurts?
Stop immediately. Pain is your body’s warning signal. Gentle discomfort (like stretching sensation) is fine, but sharp or intense pain means you’ve gone too far.
Tips for Staying Motivated
Starting is easy; staying consistent is the challenge. Here’s how to keep your practice going:
- Set a regular time: Making yoga a habit helps it stick
- Start small: 10 minutes is better than nothing
- Track your progress: Notice how you feel, not just what poses you can do
- Join a community: Online groups provide support and accountability
- Be kind to yourself: Some days will feel harder than others and that’s okay
- Remember your why: Connect back to the reasons you started
Conclusion
Yoga for beginners isn’t about touching your toes or mastering complicated poses. It’s about showing up on your mat, breathing deeply and moving your body in ways that feel good. Every expert started exactly where you are now – at the beginning, perhaps feeling a bit uncertain but willing to try.
The poses we’ve covered in this guide form a solid foundation for your yoga journey. Some will feel easier than others and that’s perfectly normal. Your practice will grow and evolve over time, but the most important step is simply starting.
Remember, yoga isn’t about perfection – it’s about practice. It’s about learning to breathe through challenges, finding balance when life feels wobbly and treating yourself with kindness along the way. These lessons extend far beyond your yoga mat into everyday life.
So roll out your mat (or find a comfortable spot on your carpet), take a deep breath and begin. Your body and mind will thank you for it.
Continue Your Yoga Journey
Ready to deepen your practice? Explore these related guides:
- Morning Yoga Routines for Energy
- Evening Yoga for Better Sleep
- Yoga for Back Pain Relief
- Breathing Techniques for Beginners
- Yoga for Stress and Anxiety
Disclaimer: This guide is for informational purposes only. If you have any health conditions or injuries, please consult your doctor before starting a new exercise programme.